|
Feature Spotlight: Building Attractive HTML Newsletters with LISTSERV
By Jani Kumpula
Senior Webmaster/UI Designer, L-Soft
LISTSERV 16.0, recently released, focuses heavily on making HTML newsletters easier to build through a new HTML template gallery with ready-to-use, customizable newsletter templates. The idea is that anyone should be able to create quality HTML newsletters regardless of technical skill level by just clicking on placeholders and filling in the content. This feature spotlight will demonstrate how to best use the new template management system in LISTSERV 16.0 to create newsletters that suit your organization and your subscribers.
1. Select Template
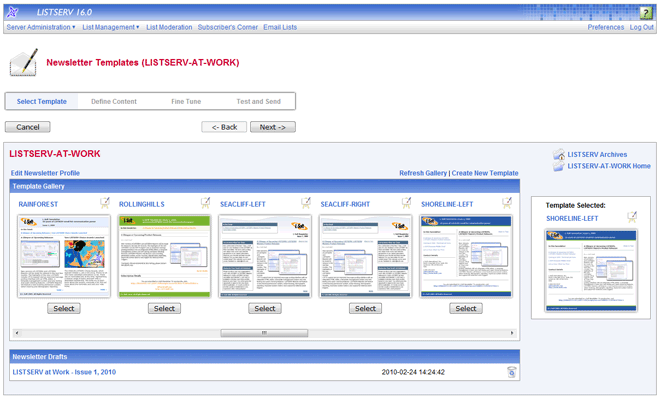
The template management system contains a number of common newsletter designs, with a mix of one-column, two-column and one-column-with-sidebar configurations. Although the templates use various color schemes that can be used as-is, an important point to consider is that the colors can be easily changed during the content definition step. Thus, when selecting a template, the most important consideration is to choose a template that has a layout that you would like to use. If you are unsure which template best suits your needs for a particular newsletter, you can pick a template to start and then change the template during the content definition step, even after you have already filled in your text and images. The content will automatically be transferred over to the new template if you choose to change it.

However, before you start creating your first newsletter, it is highly recommended that you take advantage of the newsletter profile fields, which are accessible by clicking on "Edit Newsletter Profile" from the template selection screen. The newsletter profile fields include commonly used fields, such as newsletter name, logo, slogan, contact address, phone number, website, footer and legal disclaimer. The profile fields that you define are associated with your user account and will be remembered every time you log in. Even though all of the profile fields can be populated during the content definition step, filling out and saving the fields at the start can be a tremendous time-saver for future newsletters as the fields can be reused and will be pre-populated when you enter the content definition section. Also keep in mind that all of the profile fields are optional. You can choose to define only the ones that you envision using. Any blank fields will simply be omitted from the newsletter after you are finished with the content definition.
2. Define Content
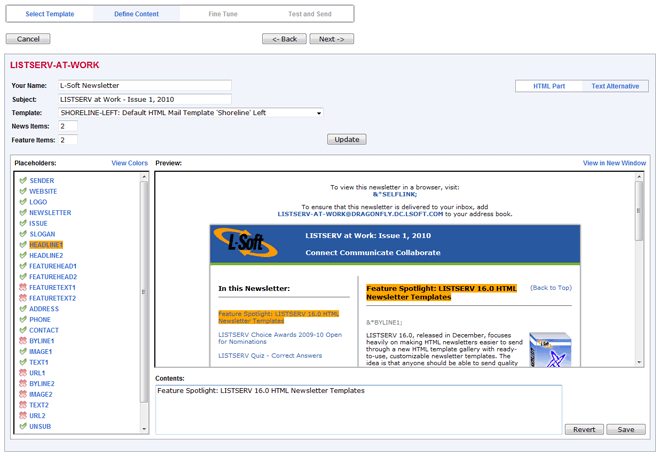
After you have selected a template, the content definition step is where the template becomes an actual newsletter. Simply speaking, the newsletter templates are made up of a header, footer, news items, and depending on the particular template, feature items. The news items are the main content pieces, which are made up of a headline, byline, text, image and a URL for linking to more information. Although formatted as a news piece in a newspaper or publication, you can choose to leave all of the component placeholders blank – except for the headline and the main text. This makes the templates flexible for all types of content, including small announcements, special offers or promotional pieces. Any blank placeholders will be automatically omitted from the newsletter when you proceed to the fine tuning step.
The feature items are smaller content pieces that appear in the sidebar and only include a headline and text. To populate your newsletter, simply enter how many news and feature items you intend to use. You can also change these numbers as you go along if the length of the newsletter changes. Then click on each placeholder and type in or copy and paste your desired content. For images, enter or copy and paste the absolute URL of the location where the image is stored. Note that the location needs to be web-accessible and not behind a firewall in order for the image to be properly displayed to your recipients.

You can toggle between placeholder and color definition by clicking on "View Colors" and "View Placeholders" respectively. Clicking on "View Colors" displays a list of all the colors used for a particular newsletter design. You can then simply click on the color that you would like to change and either use the color picker or type in the exact color code to modify the look of your newsletter. This, again, adds flexibility by allowing you to use an existing newsletter layout while changing the colors to match your organization's exact color scheme. As recommended by industry best practices, a plain text part is created automatically using the content that you enter. This allows you to accommodate subscribers who prefer to read their newsletters in text format and saves you time since you don't have to create the plain text part separately or by hand. Every time you click the "Save" button, a draft of your newsletter is saved. The draft allows you to work on your newsletters over time and will be available to you the next time you log in.
3. Fine Tune
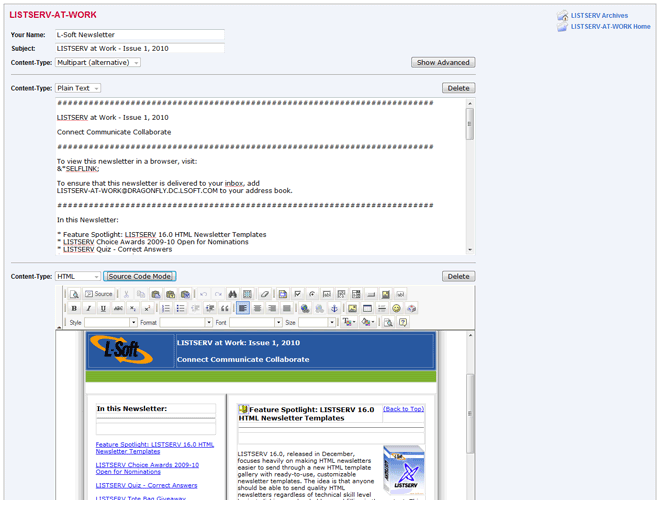
The fine tuning step offers a range of additional, advanced editing capabilities. The screen shows both the HTML and the plain text part with all populated placeholders embedded in the code and blank placeholders omitted. For sending a basic newsletter, you are not required to make any additional changes on this screen. Advanced users, however, can tweak the output however they choose. The text part is very straightforward. What you see is exactly how the text part will look when the newsletter is sent. Depending on your preference, you can make changes to the HTML part either by modifying the HTML code or by using the integrated HTML editor. Note, however, that the HTML editor renders differently on different browsers. Table cells and borders are also marked for emphasis. This means that the newsletter does not look exactly as shown in the editor. After making changes, if you would like to see your newsletter outside the editor, just click the "Preview" icon. The HTML part will then be shown in a separate window.

By clicking the "Show Advanced" button, you can also add any number of attachments and define an explicit RSS abstract, which is shown in your list's RSS feed and as a preview in the list archives, if available. If you click on the "RSS Feed" icon next to either the text or the HTML part, then the relevant part will be used as the RSS abstract in its entirety, which can be useful if you want to make your entire newsletter available through RSS.
4. Test and Send
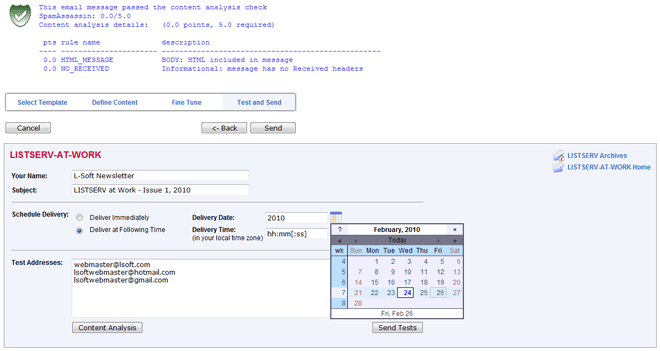
The testing step gives you an opportunity to send test messages of your newsletter to your own test email addresses before the actual delivery. This type of testing is particularly important when creating HTML newsletters because HTML standard support varies widely among different email clients. It is common practice to send test messages to several of the more popular email and webmail clients that your subscribers use, for example Outlook, Thunderbird, Hotmail and Gmail. Keep in mind that slight differences in rendering in different email client is an unfortunate fact of life and should be considered normal. In the end it's up to you to decide what you deem as acceptable variations in rendering and something that merits returning to the fine tuning step for adjustments. If your LISTSERV license includes technical support, you can also use the "Content Analysis" button to check your message and evaluate the likelihood that it will be deemed to be spam by recipient mail systems. LISTSERV will connect to a hosted service at L-Soft that runs the email message through SpamAssassin. The resulting score will be shown on screen. If necessary, you can make adjustments to your newsletter and run the test again.

When you are satisfied with your tests, the final step is to actually deliver the newsletter. You can either deliver the newsletter immediately or schedule it for a particular time and date. Note that when entering the delivery time, the time is your local time zone, rather than the time zone of the server, if different. We trust that this feature spotlight will have given you some tips on how to best use the template management system in LISTSERV 16.0 and some insight into the flexibility that is built into it. In a future feature spotlight, we will focus on how to best create custom HTML newsletter templates from scratch, which will give you the ultimate control over your newsletters – and if you're already sending HTML newsletters that you create from scratch – a process that makes your workflow more efficient. For now, all the best with your email newsletters.
For help with big-picture thinking and planning so that your email newsletter – new or improved – is truly in sync with your organization and subscribers, see Ask the Email List Guru: The Zen of Email Newsletters in this issue.
Subscribe to LISTSERV at Work (American Edition).
|