|
Q: How do I create newsletters in LISTSERV 17.0?
By Justin Rench
Software Support Engineer, L-Soft
LISTSERV 17.0 offers a new newsletter template builder that allows list owners to create fully responsive HTML newsletters with or without HTML coding experience. The system comes with 86 ready-to-use HTML newsletter and announcement templates, offering a variety of layout styles, color schemes and content blocks that can be used as-is or modified as needed.
To send a newsletter to your list, navigate to the upper-right corner of your list's home page and click on the menu icon, followed by "Send Newsletter".
This brings you to the first step where you can select your preferred template and edit your Newsletter Profile. Data for frequently reused fields, for example your newsletter logo, title, contact address, website and so on, are stored in the profile and are associated with your login email address.
The "From" address of the newsletter is also set by your login email address. If several people in your department share work on the newsletter, you will all need to use the same login address. Note that profile data and newsletter drafts that you save under your personal email login cannot be moved to another account later, so you need to create your role account first and do all of your work under that account. The newsletter profile is saved to the account and does not need to be completed every time you send a new newsletter, saving you time and effort.
Now, with your profile data saved, you can select a template of your choice from those available. Once you have made your choice, click the "Next" button under the progress bar to go to the Content step.
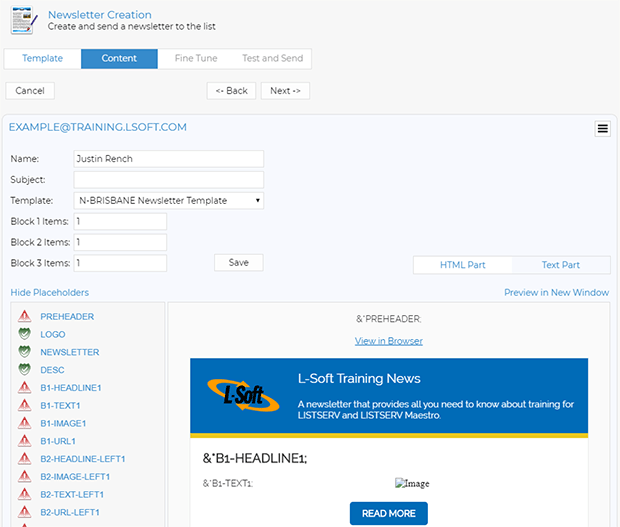
You will see that some of the placeholders are automatically filled in with the data that you stored in your newsletter profile (green checkmark). Other placeholders for news articles and changeable data that haven't been filled in yet are marked with a red triangle. Simply click on any placeholder to enter or edit any of the data. You can select the placeholder from the provided list or click directly on the placeholder itself within the newsletter. If you don't need to use an item (such as B1-IMAGE1 or B1-URL1), simply leave it blank.
 You can enter the number of content items that you have and click "Save". This will automatically create the number of items needed for each content block. To omit a certain content block, enter 0, followed by "Save". At any time when you are working on the Content stage, you can click the "Save" button to save your work in progress as a draft and return to work on it later. If you have a draft saved and wish to return to it, you can simply select "Send Newsletter" from the same menu on the list's home page. You can see your drafts listed on the bottom of the page.
When you have finished filling in your news article content, you can click "Preview in New Window" to see how the newsletter will look for your recipients. You may also notice that there is a "Text Part" option for you to view the plain text version that has also been created for you. Naturally, this won't have any images or colors, but it can still be meaningful communication for your readers.
After you have your desired content defined, you can click on "Next" under the progress bar and move on to the Fine Tune step. This step can seem rather technical as it exposes the actual text and HTML code of the newsletter. If you understand HTML code and feel comfortable making modifications, you can do so here. Of course, if you are happy with your newsletter and don't need to make any fine-tuning modifications, you can skip this step altogether.
If you are not familiar with HTML or would prefer to edit the HTML content without directly manipulating the source code, LISTSERV 17.0 provides a new and improved HTML Editor option. This provides a full interface for you to edit and fine tune your newsletter.
If you wish to include an attachment, you can do so on the Fine Tune step. Clicking the "Show Advanced" button will provide you with the additional options of changing your character set, adding a custom RSS abstract and a field to add attachments.
Once you have added and fine-tuned the content of your newsletter, you can save the newsletter with the "Save Draft" button or click "Next" below the progress bar to take you to the final step. After you click "Next", if you haven't defined an RSS abstract, you will receive a prompt to ask if you want to use the HTML part of your message as the RSS abstract. RSS abstracts are used to generate a preview of the message in the list archives and are recommended, especially under Forum View and Blog View. You may select the recommended "Use Abstract" or "Skip Abstract" if you so choose.
On the final Test and Send step, you can schedule the delivery date and time for sending your newsletter. You can also enter test addresses for people to receive test emails of the newsletter prior to delivery. It is always a good idea to send a test to someone else to review. Fresh eyes will often pick out some small error that you may have overlooked. If you click the "Content Analysis" button, LISTSERV will perform a spam check of your newsletter contents. When you are satisfied with everything, click the "Send" button to deliver the newsletter to your subscribers.
Creating Your Own Templates with the Newsletter Template Builder

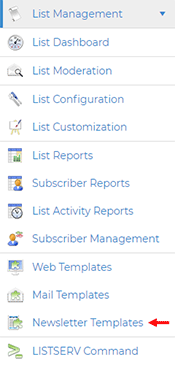
Newsletter templates can be modified or created by list owners with the newsletter template builder tool by navigating to "Newsletter Templates" under "List Management".
These modified or created templates will be saved to the list and can be used by other list owners for that list. LISTSERV site administrators can modify and create newsletter templates to be available for all lists by navigating to "Newsletter Templates" under "Server Administration".
For more information about modifying templates with the newsletter template builder, visit:
http://www.lsoft.com/news/preview170-issue4-2018.asp
To view a video tutorial, visit:
http://www.lsoft.com/LearnLISTSERV#4L0B0SKBwfM
Key Takeaways
There are seven steps to creating a newsletter.
Step 1: Log In to LISTSERV, Choose a List and Click on "Send Newsletter" in the Menu
Step 2: Select Template
Step 3: Populate Placeholders and Content Blocks
Step 4: Preview in New Window
Step 5: Fine Tune
Step 6: Save Draft
Step 7: Test and Send
Additional Advice for Time-Saving and Consistency
- Plan your newsletter look and feel first
- Decide on the email address you want to use for the "From" field of your newsletter (role email address) and log in using that address
- Collect the information you need for your newsletter sender profile. You only need to do this once.
- Choose and modify a ready-made LISTSERV newsletter template or build your own template with the LISTSERV newsletter builder tool. All LISTSERV templates are responsive and mobile-ready.
- Add an RSS abstract for quick and pleasant viewing in the online archives
- Test your newsletter before sending it to your subscribers
Subscribe to LISTSERV at Work.
|