Q: How can I import externally created newsletter templates into LISTSERV?
By Jani Kumpula
Senior Webmaster/User Interface Designer, L-Soft
You can use the HTML newsletter builder in LISTSERV to create fully responsive templates to meet most needs. However, it's not uncommon for organizations to have existing newsletters that were designed for them, or templates that were created using a different tool. This tech tip shows how you can import externally created newsletters into LISTSERV and turn them into templates with a few simple tweaks, allowing you to send them to your existing LISTSERV email lists.
The Benefit of Templates
The people who design HTML newsletters in an organization are often not the same ones who are responsible for content creation and distribution. This is what makes templates beneficial because they separate the design from the content. Creating an individual newsletter in an HTML editor can be error-prone because it allows the content creators, who may or may not have strong HTML skills, to not only enter the content but also to modify the layout and design, sometimes by mistake. In contrast, using a template locks the layout and design in place and only allows the content creators to modify specifically designated parts.
Importing Newsletters into LISTSERV
With these simple steps, you can import any type of externally created newsletter or announcement template and use them in LISTSERV for distribution to your lists.
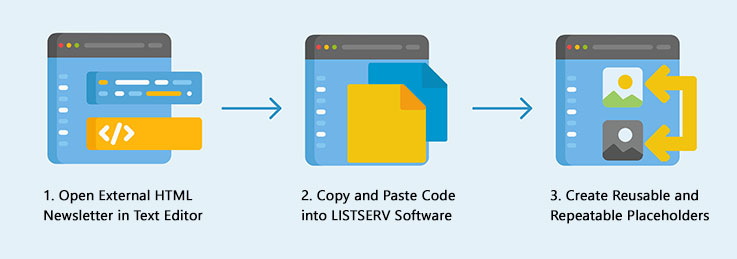
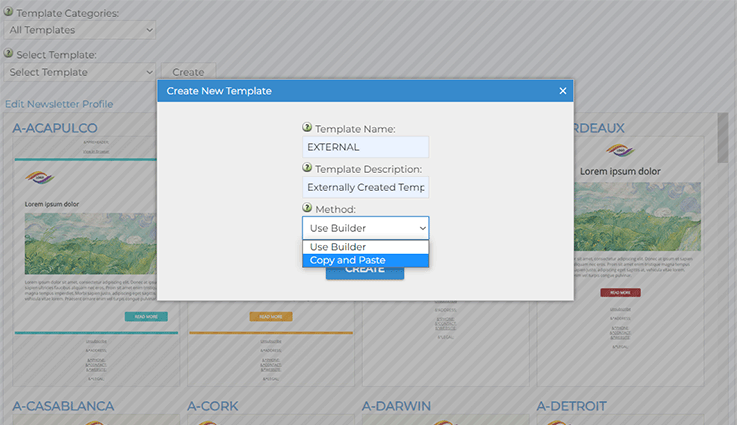
To get started, open the main menu in LISTSERV and click on "Newsletter Templates" under "Server Administration" if you want to make the template available for your entire site or "Newsletter Templates" under "List Management" if you only want to make it available for a specific list. On the newsletter template screen, click the "Create" button and enter a name and a short description for the template that you want to create. Then use the pull-down menu under "Method", select "Copy and Paste" and click the "Create" button.
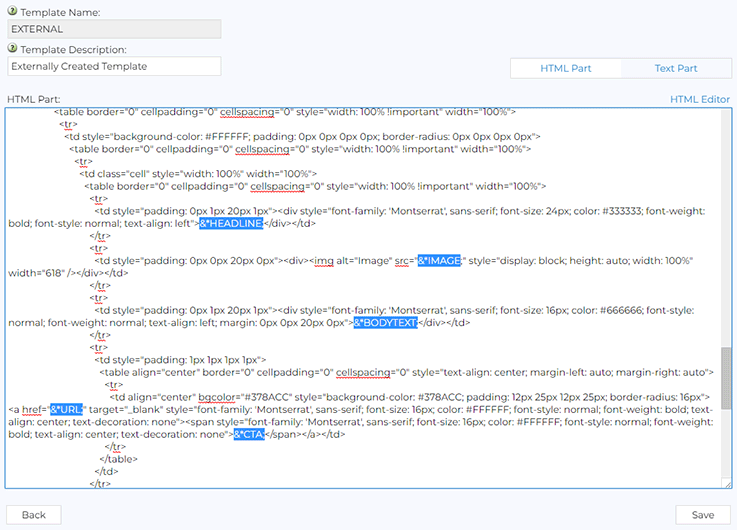
A new screen will open containing a blank area where you can enter the HTML code of the newsletter. Next, open the external HTML newsletter that you want to import in a text editor of your choice and simply copy and paste all of the code into the blank area.
Creating Reusable Placeholders
In order to make the template editable in LISTSERV so that you can send it to your lists, scroll through the code and replace all the text, images and links that change from newsletter to newsletter with placeholders. Placeholders in LISTSERV always begin with &* (ampersand and asterisk) and end with a ; (semi-colon). You can name your placeholders any way you like, but in our case, we will replace the preheader sentence with a placeholder named &*PREHEADER;. For the "View in Browser" link, we'll use a special placeholder named &*SELFLINK;, which will automatically be replaced with a unique URL to an archived version of the newsletter upon delivery.
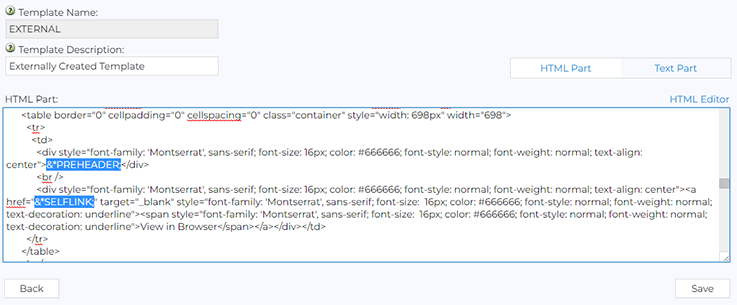
Then we'll use &*HEADLINE;, &*IMAGE;, &*BODYTEXT;, &*CTA;, and &*URL;, for the content itself. At the bottom of the newsletter, we'll replace the unsubscribe URL with another special placeholder named &*UNSUB;, which will also automatically be replaced with a unique URL, allowing people to unsubscribe from your list. When you are done, click the "Save" button.
You have now imported your external newsletter. To use your new template, go to the list archives of the list to which you would like to send the newsletter, click on the hamburger menu in the top-right corner of the main content area and click on "Send Newsletter".
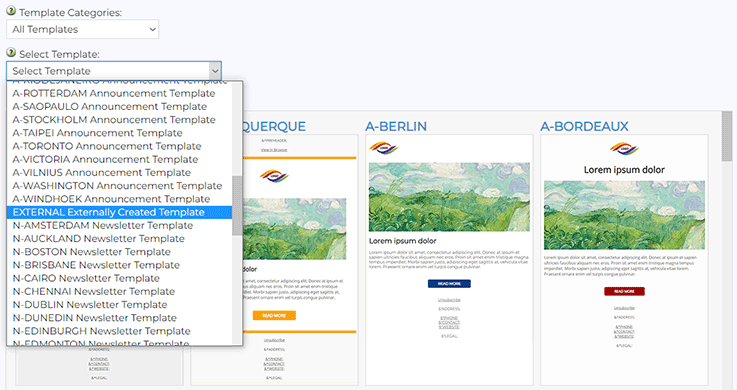
Then select your custom newsletter using the pull-down menu or click on the thumbnail at the bottom of the screen, followed by "Next".
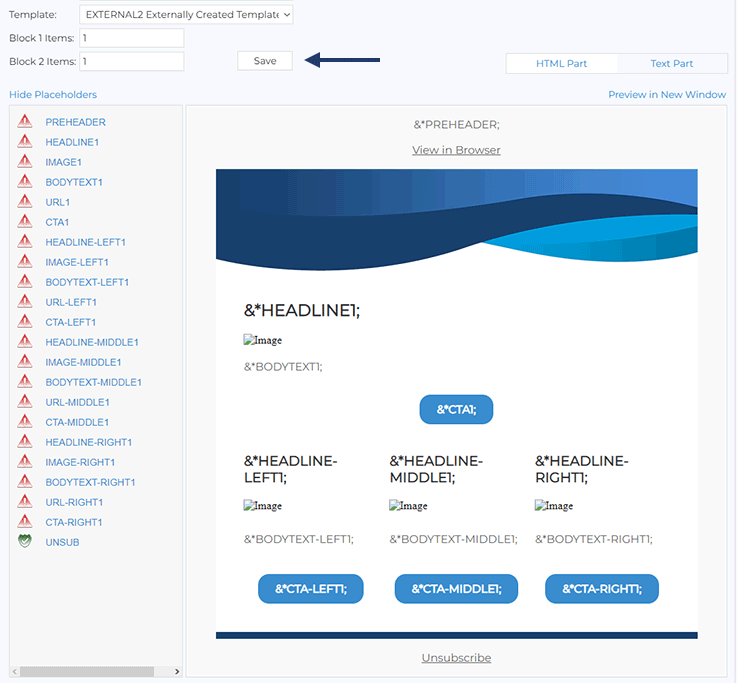
On the content creation screen, click on "Show Placeholders". You will now see a list of all placeholders that we created. Undefined placeholders are marked with a red exclamation mark, while defined placeholders are marked with a green checkmark. You can now either click on the placeholders in the list or directly on the newsletter to enter all of your content and images without having to worry about accidentally modifying the layout, design or structure of the newsletter.
Creating Repeating Content Blocks
If you need more flexibility with your imported newsletter, LISTSERV has you covered with a few simple code tweaks. Let's say that your newsletter contains two types of content blocks, a full-width area at the top and a three-column content block below. Let's also say that some individual newsletters can have more than one full-width piece, and other newsletters don't have any at all. To accommodate this, follow the steps above, create another newsletter template and copy and paste your code into the window. Now, at the very top of the HTML, enter the following code snippet:
|
<!--
+SE BLOCK1 1
+SE BLOCK2 1
-->
|
This tells LISTSERV that you're using two different types of content blocks. Then enter the usual &*PREHEADER;, &*SELFLINK; and &*UNSUB; placeholders like before. Then for the content blocks, surround the first one with the following code snippet:
|
<!--
+REP &+CGI(block1);
+SE NUM ##;
+SUB NUM ;
-->
[... HTML CODE ...]
<!--
+ENDREP
-->
|
This makes the content block repeatable or omittable as needed. Then for the other placeholders in our example, instead of using &*HEADLINE;, &*IMAGE;, &*BODYTEXT;, &*CTA; and &*URL;, enter &*HEADLINE##;, &*IMAGE##;, &*BODYTEXT##;, &*CTA##; and &*URL##;. This ensures that if a content block is repeated, then each placeholder will have a unique name with a number at the end. For the three-column content block, surround it with this code snippet:
|
<!--
+REP &+CGI(block2);
+SE NUM ##;
+SUB NUM ;
-->
[... HTML CODE ...]
<!--
+ENDREP
-->
|
Since we're using three columns in this block, we'll name the placeholders like this:
|
&*HEADLINE-LEFT##;
&*IMAGE-LEFT##;
&*BODYTEXT-LEFT##;
&*CTA-LEFT##;
&*URL-LEFT##;
&*HEADLINE-MIDDLE##;
&*IMAGE-MIDDLE##;
&*BODYTEXT-MIDDLE##;
&*CTA-MIDDLE##;
&*URL-MIDDLE##;
&*HEADLINE-RIGHT##;
&*IMAGE-RIGHT##;
&*BODYTEXT-RIGHT##;
&*CTA-RIGHT##;
&*URL-RIGHT##;
|
After saving the template, now when you go to the newsletter creation screen, you'll notice two text fields labeled "Block 1 Items" and "Block 2 Items". These allow you to enter a number for how many times each content block should be used in a given newsletter. You can also enter 0 if a certain content block should be left out altogether. When you open the placeholder panel, you will see the names of the placeholders, now followed by a number, depending on how many times a content block is used. This type of setup will give the content creators much more flexibility when creating individual newsletters, again without risking that they will accidentally modify the layout or structure of the newsletter.
Dealing with Blank Placeholders
The above setup works great if the expectation is that all placeholders will be used in every single newsletter. However, what if the headline, text, image or link can sometimes be left out, depending on the newsletter and piece? You can always leave placeholders blank on the content creation screen, but the nature of HTML is that every placeholder is surrounded by HTML tags, for example <p> or <div> for text, or <img> for images. When a placeholder is deliberately left out, you don't want to leave empty <p> or <div> tags in the code because they can cause issues with the spacing. Even worse, what if a certain news item doesn't have an accompanying image? Leaving the image placeholder blank will result in an <img> tag without a location for the image, which displays as a broken image.
This can also be solved with just a few code tweaks. Open the saved newsletter template and locate the placeholders that can be optionally left out. Then surround the HTML tags with these type of conditions, depending on the name of the placeholder:
|
<!--
+BB &+CGI(PREHEADER);&+PHL;
-->
[... HTML CODE ...]
<!--
+EB
-->
<!--
+BB &+CGI(HEADLINE##;);&+PHL;
-->
[... HTML CODE ...]
<!--
+EB
-->
<!--
+BB &+CGI(BODYTEXT##;);&+PHL;
-->
[... HTML CODE ...]
<!--
+EB
-->
<!--
+BB &+CGI(IMAGE##;);&+PHL;
-->
[... HTML CODE ...]
<!--
+EB
-->
|
This ensures that if a placeholder is deliberately left out, then the HTML surrounding it is also omitted.
Importing Externally Created Newsletters into LISTSERV Maestro
In the next issue of LISTSERV and Work, we'll approach this same scenario from the perspective of LISTSERV Maestro. In other words, we'll cover how you can import externally created newsletters into LISTSERV Maestro so that you can add advanced tracking, reporting and analytics capabilities to your email newsletters.
Next Steps
LISTSERV is a registered trademark licensed to L-Soft international, Inc.
See Guidelines for Proper Usage of the LISTSERV Trademark for more details.
All other trademarks, both marked and unmarked, are the property of their respective owners.


